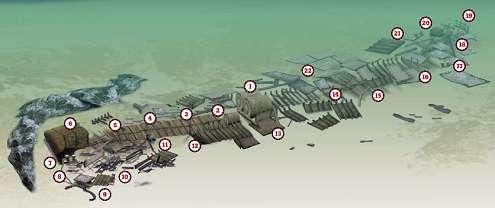
He first dived it a long time back – this Cornish wreck provided JOHN LIDDIARD’s first wreck experience, and that of many other divers. Illustration by MAX ELLIS
THE NEW UK DIVING SEASON IS APPROACHING FAST and soon diving clubs from all over the country will be descending on their favourite early-season training locations to get the new crop of divers into open water.
Having completed a few easy shore dives, the next target will be a wreck, and for clubs that frequent the Lizard, that wreck will nearly always be the Volnay. This provided my first wreck dive and I am sure many other divers will look back on it with equal fondness.
About the only parts of the Volnay that stick up far enough to show well on an echo-sounder are the boilers. The rest of the wreck is pretty much flat against the seabed and, with shallow rocky ledges towards the bow, it is difficult to get a reliable echo anywhere else.
With hardly any current to worry about, even on a spring tide, once you have an echo it’s easy enough to drop a shot right on top of the boilers (1). These stick up to about 5m from a seabed depth of between 18 and 22m, depending on the state of the tide.
The bow lies to the south, but all that metal makes a compass useless. To sort out the orientation, a quick circuit of the boilers reveals the fire-holes at the front and a smaller donkey-boiler forward and to the port side of the wreck (2).
Continuing forward, the area of debris from the holds is fairly flat and bare (3). Fortunately, the wreck has not twisted significantly, so the exposed metal ribs can be used as a navigation aid.
There are still traces of the Volnay’s cargo of munitions scattered about the hold areas: rusting steel warheads, balls of lead shot and sticks of cordite looking like wholemeal spaghetti.
Heading towards the starboard side and following the wreckage forward, the halfway point to the bow is marked by a mast-foot just off the side of the main area of wreckage (4). The bow has collapsed to port. The first sign of this is a broken section of hull slightly to starboard of the main part of the wreckage (5). From here, a 1m rocky ledge can be seen off to the west of the wreck.
A substantial section of bow is lying on its side (6). It would be easy simply to swim past it as blank metal plate, but there is actually a way in to the rear of it, with a swim-through to the top of the bow (7).
I wouldn’t recommend this to anyone without plenty of experience inside wrecks. It is tight and there are lots of metal projections on which to get caught.
Having said that, anyone can poke their head inside and watch the swirling mass of bib and poor cod that inhabit the sheltered area.
Above the bow, to the port side of the wreck, debris from the deck includes a pair of mooring bollards (8) and a small crane that would have been used to service the anchors.
The anchor-winch itself lies upside-down and a little further to port (9). This is the shallowest area of the wreck and is a metre or two shallower than the seabed at the boilers.
Now heading back towards the boilers, just behind the anchor-winch is a sizeable section of railing lying flat against the seabed (10). Just behind this is a drum with cable wound round it.
If you imagine the hull of the ship as a rectangular trough shape, with the sides collapsed outwards, the easiest line to follow is the break where the port side has collapsed away from the keel.
Approximately halfway back to the boilers, a winch lies almost on this line (11), just about opposite the mast-foot mentioned earlier (4).
Further back, a solitary girder stands upright about 2m above the general level of the wreck. Continuing along this line, the donkey-boiler (12) will soon become visible on your left.
For many divers, just half of the wreck will be almost enough for one dive, so using up spare time by ferreting around the boilers before ascending the shot is probably the best way to finish. However, for a longer or second dive, staying to the port side of the wreck (13) is a convenient way to navigate towards the stern.
Behind the boilers there is little sign of the engine; it must have been salvaged or substantially dispersed.
The aft part of the wreck appears to have twisted to starboard slightly about halfway back (14). Here the way in which the wreck has collapsed changes, from hull-plates fallen outwards with ribs exposed, to plates fallen inwards with flat steel upwards. Again, little clusters of lead shot and tufts of cordite mark the area of the holds.
Navigation can be particularly difficult on the aft part of the wreck. Winter storms often drift sand and silt across it, covering familiar landmarks and uncovering new bits of wreckage. There is a peculiar twisted girder with a cleated edge leading back in towards the main body of the wreck (15).
With nothing but flat plates ahead, navigation to the stern from here is pretty much a matter of judging the right direction and being able to swim straight. The edges and seams between plates provide some reference, and there is wreckage all the way.
As you near the stern, a large iron cleat or fairlead lies diagonally across the wreck (16), followed by a pair of bollards slightly to the port side (17).
Just behind the bollards lies the base of the rudder-shaft (18). This slopes upward and towards the starboard side of the wreck, confirming that the stern had fallen to starboard before breaking up completely.
The top of the shaft is a few metres above the seabed, and even in the negligible current you’ll find a cluster of plumose anemones growing on it.
Behind the rudder-shaft, an upright curved section of railing from the stern marks the end of the wreck (19). Just forward of the rudder-shaft is a large pile of chain and another pair of bollards (20).
If the visibility is not good, finding the way back to the boilers from here can be difficult. It’s easy to end up going in circles or continuing past the boilers on either side of the wreckage without noticing them.
Taking a general direction from the ribs of collapsed hull sections (21), there are occasional sections with ribs exposed that can be used to confirm the lay of the wreck. A hull-plate that has bent into a large curve (22) marks the halfway-back point on the starboard side of the wreck.
It is worth moving towards the centre-line of the wreck from here, but not turning so far as to go round in circles. All being well, you will bump into the boilers and be set for an ascent up the shotline.
During the summer months and even at times throughout the rest of the year, the visibility on the Volnay is often very good and navigation is not difficult.
On the other hand, bear in mind that on a busy Easter weekend when you are the 100th pair of divers on the wreck that morning, finding your way back to the shotline can be as difficult as I have described.
Christmas came early
When the convoy from Montreal broke up at Barry in early December 1917, Captain Henry Plough followed his orders and took the 4,609-ton Volnay and her lethal load of 18-pounder shrapnel shells and more cheerful cargo of tinned meats, butter, jam, coffee, tea, cigarettes, peanuts and potato crisps round Land’s End, heading for Portsmouth
He zigzagged as the Admiralty had ordered, though he was well inside the mineswept channel, writes Kendall McDonald. Even so, when two miles east by south of the Manacles at 12.45 am on Friday 14 the 117m Volnay hit a mine laid by a German U-boat.
Captain Plough and his crew were lucky. Though the mine had blown a hole into number 1 hold on the starboard side, the shell stacked in there did not explode.
In the dark it was difficult to see how bad the damage was, but the engines were still running, so the captain set course for Falmouth. He soon realised he would not make it.
The bow was dipping further and further down. He headed for the nearest land, but was less than half a mile away in Porthallow Bay when the Volnay lurched to port, came upright again and then started going down by the bow. All aboard abandoned ship safely.
Next day the weather worsened and the easterly gale finished the job. Cases of coffee and tea, tins of meat, butter and jam and cartons of cigarettes were piled 2m high on Porthallow beach. The residents of the Lizard had a wonderful unrationed Christmas!
GETTING THERE: Follow the M5 to Exeter, then the A30 and A3076 to Truro, and the A39 to Falmouth. For the closest launch sites just before Falmouth, follow the A394 to Helston, then take the A3083 towards Lizard Point and turn left on to the B3293 to St Keverne immediately after passing RNAS Culdrose. From the square in St Keverne, turn left for Porthkerris or go straight across for Porthoustock.
DIVING AND AIR: On the Lizard, Dive Action in St Keverne run boats from Porthoustock and can supply air and nitrox. Porthkerris Dive Centre runs a number of dive-boats, can assist with beach launching and has a compressor. In Falmouth, try Cornish Diving.
ACCOMMODATION: Local dive-centres can put you in touch with convenient accommodation. Some even have their own. There are many local caravan-sites and renting a static caravan can be particularly good value for money.
LAUNCHING: The nearest slip is at Falmouth. Beach-launching is possible over shingle beaches at Porthkerris and Porthoustock. At Porthkerris, you will need assistance from the dive-centre’s snow cat to survive the shingle. Porthoustock beach is just passable for a 4×4 if the driver is careful. Divers are discouraged from launching at Coverack. Further south it is possible to launch across the sand at Kennack.
TIDES: It is slack enough to dive here at all states of the tide.
HOW TO FIND IT: The GPS position of the Volnay is 50 04.25N, 05 04.03W (degrees, minutes and decimals).
QUALIFICATIONS: Anyone from a freshly qualified diver and up.
FURTHER INFORMATION: Admiralty Chart 154, Approaches To Falmouth. Ordnance Survey Map 204, Truro, Falmouth And Surrounding Area. Diver Guide – Dive South Cornwall by Richard Larn. Falmouth tourist information, Helston tourist information and also try Visit Cornwall. Many local pubs have historical photographs and wreck memorabilia on the walls. Particularly worth checking out are the Five Pilchards in Porthallow and the Three Tuns in St Keverne.
PROS: Sheltered from westerly bad weather. Shallow enough for newly qualified divers.
CONS: Particularly crowded on Easter weekend.
Thanks to many members of the University of Bristol Underwater Club.
Appeared in Diver, February 2001