At last, you cry, a big sailing ship to get our teeth into! And this one, off Falmouth, is also shallow enough to let everyone get a taste, says JOHN LIDDIARD. Illustration by MAX ELLIS
IT CAN BE DIFFICULT TO FIND A WRECK of a sailing ship that retains enough detail to make it worth an entire Wreck Tour all by itself. At the end of last year we went some way to fill the gap with a double tour of a pair of less-detailed sailing-ship wrecks, the Thracian and the Highland Home, but before that it had been six years since we toured the Oregon in South Devon (Tour 31, September 2001).
However you look at it, another full tour of a sailing ship is long overdue. So this month we tour the wreck of the four-masted barque Hera, wrecked behind Gull Rock to the east of Falmouth at the start of 1914.
At 16m deep, the Hera is an ideal wreck for beginners and training dives. Diveable pretty much at any state of the tide, it also makes a great second dive to follow a deeper offshore wreck on slack water.
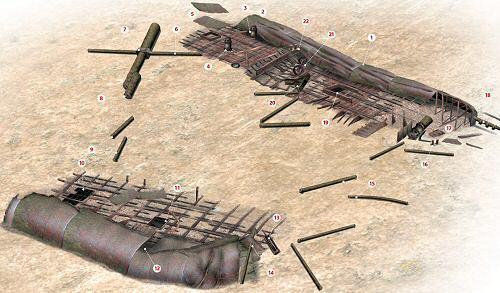
When I dived the Hera, a buoy was tied to the keel (1), so our tour begins at the western edge of the wreckage, which is close to the keel.
From here we head aft, keeping the rise of the keel on our left shoulder until it breaks up (2). On the way, there are plenty of gaps in the metalwork and crevices beneath the hull-plates that could repay a look inside for any of the usual wreck-life, such as lobsters and conger eels. Above deck, there are always the wrasse to keep divers company.
Just before the hull breaks, across the wreck are a pair of capstans (3) and (4). These are positioned between the main and mizzen masts, the second and third of four masts overall. Aft from here, the Hera has split in two (5).
There is nothing further along the existing line of the keel, and to find the other part of the wreck you need to follow a trail of spars and masts across a 20m-or-so gap between the two parts of the wreck. To find the way across, return to the starboard capstan (4), and locate a double spar leading out from the starboard side of the wreck (6).

This spar crosses a tubular mast (7). The position among the wreckage corresponds with the approximate location of the mizzen mast, but this is also the biggest section of mast, so might have been the main mast dumped out of position as the Hera broke its back.
Following up the mast, this ends with a step to the next section of mast (8). This soon concludes in a scattering of broken sections (9) that lead to the aft part of the wreck.
The Hera must have broken in two as it was sinking, because the two sections of broken hull lie facing each other and almost parallel. To achieve this without total devastation, the stern part must have remained clear of the seabed as it was pushed round by the sea to come to rest facing the bow part.
Following across the break on the aft part of the wreck towards the keel, close to the edge of the collapsed deck is an area of tiles from the bathroom floor (10).
The general pattern of the decks is grids of ribs that would have supported wooden decks. With the wood nearly all rotted away, this leaves the grids superimposed on top of each other as the decks have collapsed.
Using the grid to navigate further aft, a small coaming (11) would most likely have been covered by a wooden-framed skylight, or perhaps a small cuddy or deckhouse to guard access below. Next to this is one of the boat derricks. An original photograph of the Hera shows this at the front of the raised quarterdeck.
Towards the port side of the deck are the remains of the steps between the main deck and the quarterdeck (12)
The hull on this section has not collapsed as far as that of the forward section. In places the gap is high enough to venture inside and swim along, though as always when inside a wreck, especially one that has collapsed, be careful to avoid further collapse and to ensure that you don’t get disoriented or stuck.
The hull about the quarterdeck stands a little higher, still collapsed to starboard, with the rudderpost and a section of the steering mechanism (13) right at the stern. Below the rudderpost, the rudder (14) is intact, the lower part buried in the sand.
To return to the forward section of the wreck, a trail of mast sections and spars (15) leads a disjointed path across the sand and gravel, meeting the bow roughly at a small pair of bollards (16) and the anchor capstan.
The Hera was built in 1886 and had a crew of 24 to manage 2084 tons of ship, so it is possible that there was a small donkey boiler somewhere to provide steam power to some of the machinery, though I have found nothing on the wreck to confirm this.
The framework for the bow (17) stands on its starboard side and rises 4m or so above the seabed. The individual frames are covered in some nice groups of plumose anemones, making this the most photogenic scene on the wreck.
At the front of the bow, the lower part of the bowsprit (18) juts 2m or so above the seabed. Rings along the top of the bowsprit indicate that it would have originally been extended, with a wooden spar making it considerably longer.

Our route now turns aft along the deck. After a few upright frames and a short span of the familiar grid of the flattened decks, the next significant feature is a hatch coaming from the forward hold (19).
Immediately behind the hold coaming is the foot of the main mast (20), with a cluster of spars spread away from the wreck, though no sign of the mast itself.
Next to the mast foot stands a hand-operated pump, a vertical blob with a nice iron hand-wheel with curved spokes (21) mounted on one side of it.

As a note to any wannabe spidge collectors, please don’t be stupid enough to remove this. Iron this old that has been soaking in seawater will only disintegrate as soon as it dries out.
Our tour has now covered pretty much all the wreck. A pair of bollards to the port side of the deck (22) indicate the point at which to cross the hull and return to the buoyline to ascend.
Alternatively, with no current or deco, and assuming there is no boat traffic, the Hera is one of the few wrecks where it can be safe to ascend pretty much anywhere.
WHISTLING IN THE WIND
HERA, cargo sailing barque. Built 1886, SUNK 1914
THAT ANYONE WAS SAVED FROM the 2084-ton German sailing barque Hera was entirely due to two Able Seamen blowing blasts on the Mate’s silver whistle, as they clung high in the rigging of one of the four masts of their sinking ship near Cornwall’s Nare Head on 31 January, 1914.
Only five of the crew of 24 were saved by the Falmouth lifeboat, which was guided through the dark to the 280ft-long wreck by the shrill calls of that whistle, writes Kendall McDonald.
The Hera was built in a German yard in 1886, but when she was launched she was named Richard Wagner and sailed under the British flag.
After years of successful long voyages for the British company, she was sold to a German company, Rhederei Aktien Gesellschaft of Hamburg, to replace its Pindos. This was another four-masted sailing ship that had been lost when she sank near Coverack in February, 1912.
The voyage which was to be Hera’s last meant that she was heading for Falmouth for orders, having been heavily laden at Pisagua with Chilean nitrate, described in her cargo manifest as saltpetre.
The nitrate was not a popular cargo, whatever name was used for it, because the sailors knew that it was really the droppings from millions of seabirds, and stank to high heaven!
It took 91 days of rough weather, fog, contrary winds and lashing rainstorms for Hera to get close to Falmouth Bay. Captain Lorentz expected to see the Lizard or St Anthony Lights, but days of dead-reckoning navigation seem to have let him down.
Hours passed without any sign of land as the weather grew worse. At midnight, a look-out yelled “Land-ho!” and so it was – dead ahead. Attempting to put about resulted in the ship crashing violently into Gull Rock in Veryan Bay. Distress rockets were fired and the boats manned as the Hera rolled clear of the rocks and began sinking quickly by the head.
The captain’s boat capsized, drowning him and three of the crew. The rest abandoned the boats and climbed the rigging as the ship sank beneath them.
The Chief Mate slipped into the icy sea, as did the Second Mate, but not before he had passed his silver whistle to the seaman in the rigging above him. When he was unable to blow any more, he passed it on upwards.
Finally the lifeboat found the wreck and saved five men from the rigging. Within a few more hours only the foresail and topmast showed above the waves. They were still showing days later, when the wreck of the Hera was sold to Harris Brothers of Falmouth for £205.
TOUR GUIDE
GETTING THERE: Approaching Falmouth, follow the signs for the docks to bypass the town centre. Cornish Diving is located on Bar Road, a couple of hundred metres back from the marina slip.
HOW TO FIND IT: The GPS co-ordinates are 50 12.015N, 4 54.275W (degrees, minutes and decimals). The wreck lies broken in two with both bow and stern to the north. There is often a small buoy tied to the wreck.
TIDES: The Hera is diveable at any state of the tide.
LAUNCHING: Slip at the marina in Falmouth.
DIVING & AIR: RIB or hardboat with Cornish Diving, 01326 313178. Air, nitrox, trimix and full equipment hire are available from the shop.
ACCOMMODATION: Bunkhouse conveniently next door to the dive shop.
QUALIFICATIONS: Nice and easy diving for those with basic open-water qualification.
FURTHER INFORMATION: Admiralty Chart 1267, Falmouth to Plymouth. Ordnance Survey Map 204, Truro, Falmouth & Surrounding Area. Dive South Cornwall by Richard Larn.
PROS: Can be dived at any state of the tide. An ideal wreck for beginners and for training.
CONS: Some parts of the wreck can get kelped-out later in the season.
DEPTH RANGE: -20m
Thanks to Steve McEwan.
Appeared in DIVER March 2008