It’s a bit out of the way in Cardigan Bay, but how, asks JOHN LIDDIARD, do you get to dive a WW2 destroyer and Cold War frigate all in one? MAX ELLIS is the illustrator
I CAN ONLY INTRODUCE this month’s Wreck Tour as something really special and inspiring – a wreck that is unique. HMS Whirlwind was the Type 15 frigate F187, rebuilt for the Cold War from the hull of World War Two emergency-build destroyer R87.
As a wreck, it is not only one of a kind, but it is also at a comfortably accessible depth of 36m, though a bit out of the way for many divers, in Cardigan Bay.
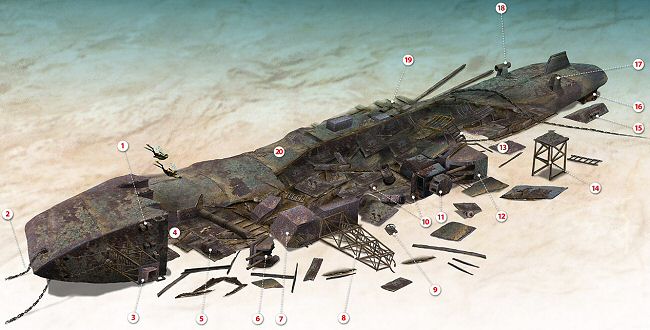
Our tour begins at the highest point of the wreck, 6m above the 36m seabed, on the starboard side of the bow by a large pair of bollards (1).
The bow rests 90° over on its port side, as I would guess the whole ship did when it initially sank in the Cardigan firing range.
Following the tapering bow forwards and deeper, chain mooring cables extend from hawse pipes on the port and starboard side (2), and lead off to the north and west.
Above deck, the cables stretch back beneath a range target platform (3), a light latticework tower welded to the deck after HMS Whirlwind was decommissioned and handed over to the firing range in 1974.
Behind the target platform, a square of four large bollards is mounted across the centre-line, with loops on the mooring cables hooked over them. The bow deck now comes to an abrupt end where the bridge would have been located (4). Here the wreck is considerably broken, and the debris is closer to the seabed.
The bridge of the Whirlwind was low, only one deck above the forecastle and the superstructure extending aft at a similar level, putting it two decks above the main deck. This was one of the first fully enclosed bridges fitted to a Royal Navy frigate, a welcome change from open bridges in the North Atlantic winter.
A truncated pyramid (5) with a small hatch in one side may have been an ammunition locker for the twin 40mm Bofors anti-aircraft gun (6). A heavy tube among the debris towards the hull could have been part of the bracing and support for the gun position.

Immediately aft of the anti-aircraft gun, a small raised deck-house would have been the observation position, with an optical range-finder mounted on the roof (7).
Another lattice structure is the ship’s main mast (8). This is considerably taller than the range target platforms, and tapers towards the top.

When you look closely, the construction is much stronger than that of the range target platforms, with additional cross-bracing to support the weight of radio and radar antennae through whatever stresses heavy seas could inflict on the frigate.
On the seabed behind the mast, a small anchor (9) is probably nothing to do with HMS Whirlwind, but one lost here or dumped by trawlermen on a known “foul ground”.

The wreckage now gets a bit confused where the hull has collapsed, partly covering the remains of the deck and superstructure. The reinforced tube from the centre of the funnel lies between two mushroom-style ventilator covers (10).
About here, the extended forecastle would have ended, the sides of the hull dropping to main deck level, though none of this detail is apparent on the wreck.
The next big structure is another fire-control position with a rotating mechanism on top that would have supported the Whirlwind‘s radar (11). This would have been covered by a lightweight dome.
Immediately behind it is the twin 4in gun turret (12), though this could be easy to miss because the gun barrels point forwards and are largely obscured by wreckage. The turret has an open back, revealing the breeches of the guns and gun-training mechanisms inside.
Behind the turret, HMS Whirlwind’s deck opened out to provide wells for two Mark 10 Limbo anti-submarine mortars.
These three-barrelled mortars were developments of the wartime Squid system, launching a spread of three depth charges in any direction about the ship. A turned-over section of the upper deck, with steps “descending” (13), would have led into one of the Limbo positions.
The stern of the ship has twisted almost completely over. A chain runs across and partly through the wreck, then off to the west. It’s hard to tell whether this was another mooring-chain from the firing range, or arises from an anchor fouled on the wreck after it sank.
Looking beneath the overturned deck, a wide tube may have been part of one of the Limbo anti-submarine mortars.
Standing away from the wreck, by some miracle upright on the sand, is the aft range target platform (14), identical in every way to the forward platform. I suspect that to land upright like this it must have broken away from the deck as the ship capsized, and then fell independently to the seabed.
A section of deck with a pair of bollards has broken from the hull and stands just off the side (15).
Beneath the overturned hull, the deck is held up from the seabed by an enclosed winch-housing (16). This may have been used for towing a sonar array behind the ship when searching for submarines.
The upturned hull is relatively flat at the stern, typical of a ship built for speed.
In the centre is a single large rudder, and there would have been propeller-shafts to either side.
The A-frame supporting the starboard shaft is truncated (17), while that supporting the port shaft is intact (18).

Both propeller-shafts broke away from the A-frames before the stern twisted over, and now rest on the seabed, slightly out from the wreck.
The propellers are missing, and would either have been removed when HMS Whirlwind was decommissioned, or were salvaged from the wreck. After it sank, the Hydrographic Office reported: “Salvage work not expected for some time”.
Perhaps there has never been any salvage; there is little sign of it, and the Royal Navy may well have had other uses for a pair of bronze high-speed propellers. The hull of HMS Whirlwind could have been towed to the range by tugs.
Following the shafts forward, one disappears beneath the hull, and the other leads into the casing of a gearbox (19).
The steam turbines that powered HMS Whirlwind turned at high speed, and the gearboxes would have reduced this to a rate more suitable for a ship’s propellers.
Although overturned and even caved in, the hull is relatively intact (20), so other machinery such as the turbines themselves and the boilers are inaccessible – assuming, that is, that the turbines were not removed when HMS Whirlwind was decommissioned.
With a seabed at 36m, seeing this much of the wreck in a single dive could put you well into decompression, so it is probably time to ascend, either on a delayed SMB or, with a larger group, to rendezvous at a decompression station and cast off from the shotline.
TARGET PRACTICE ON WAR VETERAN
HMS WHIRLWIND, destroyer. BUILT 1943, SUNK 1974
SHE STARTED OFF as one of the 32 wartime emergency builds of C-class destroyers, ordered in 1942, and was known in the Hawthorn Leslie yard as R87. She was one of only two to be named, writes Kendall McDonald.
She was called HMS Whirlwind shortly after her launch on the last day of August 1943. She weighed in at 1710 tons, 339ft long with a beam of 36ft, and was armed with four 4.7in and five 40mm guns and eight torpedo tubes.
She joined the Royal Navy’s Home Fleet in 1944, but was soon transferred to the Far East, where her activities became even more warlike.
During Operation Meridian, she was one of the escorts of the carriers that sent aircraft to attack the Japanese-held oil refineries in Indonesia.
Whirlwind took part in the bloody battles of the US army to capture Okinawa, then supported the re-occupation of Hong Kong before coming home at the end of the war.
Five years later, the Navy decided that it needed large numbers of frigates to cope with the Russian submarine threat. New frigates took time to build, and to fill the gap wartime destroyers were converted.
HMS Whirlwind was one of the first to be rebuilt, and in 1953 she was stripped down to her hull and engines. Her shape was altered by extending the forecastle aft, and a new superstructure was fitted with special lattice-work masts to add new radar and communications antennae to hunt for the Russian subs.
Now a Type 15 anti-submarine frigate, she was numbered F187. Her tonnage was increased to 2300 tons by the changes.
Now forward of the bridge was a twin 40mm Bofors AA-gun turret, and aft was a twin 4in-gun turret. At the stern on each side were two Squid anti-submarine mortars.
By 1974 Whirlwind was obsolete, and the threat from Russian submarines had faded, so the Navy made her a target for more modern craft. Target markers were fitted to bow and stern, and on 29 October, 1974 she was anchored in Cardigan Bay firing range.
On that day she was shot full of holes by ships firing shells without explosive warheads. The next morning, Whirlwind had sunk from sight.
TOUR GUIDE

GETTING THERE: Follow the M4 and A40 to Fishguard and on to Goodwick (where the ferry terminal is). Celtic Diving is next to the Ocean Lab and the tourist information centre on the waterfront.
HOW TO FIND IT: GPS co-ordinates are 52 16.791N, 004 40.527W (degrees, minutes and decimals). The wreck lies with bow to the north-west on a generally flat seabed, so shows up well on an echo-sounder.
TIDES: Slack water is essential, and occurs 4 hours and 30 minutes after high- or low-water Milford Haven.
DIVING & AIR: Celtic Diving, 01348 871938. The closest nitrox source is at Old Mill Diving Services near Milford Haven, 01646 690190.
ACCOMMODATION: Bunk rooms at Celtic Diving for up to 20 divers.
QUALIFICATIONS: On a high-water slack, just into the qualification requirements of BSAC Dive Leader or PADI Advanced Open Water with Deep speciality. It’s just within a BSAC Sports Diver’s 35m limit on low water. A good depth for taking advantage of nitrox.
LAUNCHING: The public slip is located by Celtic Diving, just along the waterfront from the entrance to the ferry terminal in Goodwick. It dries for a couple of hours either side of low tide. It is also possible to launch from Cardigan, but access from the river to the sea is limited to high water by a sandbar.
FURTHER INFORMATION: Admiralty Chart 1973, Cardigan Bay – Southern Part. Ordnance Survey Map 157, St David’s & Haverfordwest Area. Shipwreck Index of the British Isles Vol 5, West Coast and Wales, by Richard & Bridget Larn. Fishguard tourist information, 01348 872037.
PROS: An inspiring wreck and a unique opportunity to dive a Cold War frigate.
CONS: Just past the maximum depth for many divers. If you want to use nitrox, you will need to bring it with you.
DEPTH: 35-45m
Thanks to Mark Dean, Bob Lymer, Dave Wakeham and Jim Hopkinson.
Appeared in DIVER August 2010


My first ship 1961.
Twin four inch guns made byMarshalls of Gainsborough. Radar was Air 277, Surface 293 and Navigation 974
When i was Paint ship painted Pennant numbers F187