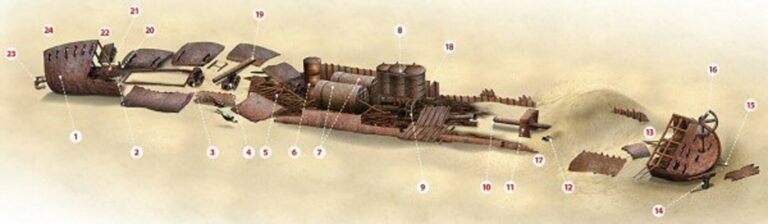
This carelessly lost World War One victim off the Dorset coast offers plenty to see and good vis in which to see it, says JOHN LIDDIARD. The illustration is by MAX ELLIS
THIS MONTH WE TOUR a “Hungry Hogarth”, so named because the Hogarths who owned the Baron line had a reputation for being economical with supplies for their crews.
The 1,831-ton steamship Baron Garioch is one of a cluster of World War One U-boat victims between Anvil Point and the Isle of Wight.

The most intact parts of the wreck, and consequently the parts that stand highest from the 37m seabed, are, as usual, the stern, the engine and boilers, and the rather large bow (1), where skipper Trevor Small conveniently drops the shot.

On deeper wrecks I’m a big fan of having the shot at one end, because I can see as much as possible in one pass without back-tracking.
This isn’t so important at the depth of the Baron Garioch, where I can do two lengths of the wreck in a dive, but having the shot at one end still makes orientation particularly easy.
Moving aft and towards the port side, the hull has broken down close to the seabed, allowing the bow to fall to starboard.
Close to the port side and tucked in just aft of the bow, the first item of note is the toilet (2), upright and still attached to a deck-plate that has fallen into the hold, with the rim broken on one side.
The second winch (4) has fallen a little further aft, closer to the middle of the hold and slightly to port. Continuing aft, the debris from the hull and decks is clearer of sand, which makes picking out significant parts of the wreckage both easier and more difficult.
The helm (5) has fallen straight down from where the wheelhouse would have been, on the centreline of the ship.
Behind it, the donkey boiler (6) stands on one end. It would originally have been saddled above and across the front of the two main boilers (7).

Behind the boilers, the triple-expansion steam engine (8) is upright and intact, with the connecting rods visible and a whole host of engine-room debris heaped around the base.
From beneath the low-pressure cylinder, the auxiliary drive to the pump (9) extends as a pair of rockers out to port.
At the back of the engine, the thrust-bearing is buried in debris, but follows the general line a couple of metres aft, and the propeller-shaft points the way to the stern.
The aft holds are, like the forward holds, flattened to the seabed. However, tide has washed a bank of sand over this part of the wreck, so much of the debris is buried.

A few metres along the propeller-shaft there is a small break at a flanged joint (10). The shaft then continues through a square section of tunnel (11) before disappearing below the sandbank.
Here we come to the first option in our tour. If time is running low and you are unsure of holding a straight line across the sandbank and back again, now may be the time to skip the stern and turn round, rejoining our tour to the starboard side of the engine-room (18).
Despite disappearing below the sand, the wreck of the Baron Garioch holds its line well, so as long as you follow the line of the propeller-shaft, perhaps biasing it slightly to port, you should be OK. It’s because of this small navigational hurdle that I have given the wreck a difficulty rating of 3.
On the way across, keep an eye out to port for the end of a cargo-winch (12) sticking out of the sand. It’s a useful reassurance that we are heading in the right direction.

The sand will soon start to slope down again, to reveal the stern of the wreck (13) fallen to port. Initially the structure is nice and open, with the deck rotted away, so a look just inside is relatively easy.
Following the deck of the stern round to port, the 13-pounder stern gun (14) has fallen from the deck and stands upright on the seabed.
Rounding the stern, the rudder is just an empty frame (15). It is pushed up beneath the stern and disappears into the sand.
The keel beneath the stern is buried, and I suspect that the propeller is also buried; had it been salvaged, the rudder would most likely have been damaged in the process.
Above the stern, the rudder-shaft extends up to the steering quadrant (16). Linkages that would have been at deck level now hang well above the deck, showing how far the rudder and rudder-shaft have been pushed up.
Again we come to an option in our tour. If one length of the wreck is enough, the steering quadrant is a convenient place to launch a delayed SMB and ascend. Otherwise, the easiest-to-navigate route back across the sandbank is to follow debris from the port side of the wreck and hold the line as it disappears into the sand before reappearing (17).

With our route aft having been biased to the port side of the wreck, our way back to the bow now crosses to the starboard side of the engine-room (18), back past the boilers and along the starboard side of the forward holds, past the fallen mast (19) and a section of railing.
As our route meets a pair of deck bollards (20), look up to see the shadow of the bow above.
Just inside it, a pile of concreted anchor-chain (21) has fallen from the chain-locker. Often the sides of a chain-locker would have been made of thick softwood beams, a bit like railway sleepers, so the pile of chain is tight where it concreted before the beams rotted away.
Back outside the bow, the deck has fallen to starboard and the anchor-winch (22) has fallen upside-down onto the sand. Neither anchor is in place, but one of them can be found in its hawse-pipe (23), just forward of the bow. I suspect that the other anchor is buried beneath the wreck.
If you have made it this far, the current will be running and a DSMB will be vital for the ascent. The upper port side of the bow (24) is a good place to fire it off.
A fateful breakfast
The Baron Garioch should have spent much of her time zigzagging, but when it mattered most her skipper Laurence Leask was concentrating on breakfast. As a result he managed to get two of his 23 crew killed by a U-boat, writes Kendall McDonald.
The British schooner-rigged 1831-ton steamer was built in West Hartlepool in 1895 for Henry Hogarth & Sons of Glasgow. Her cargo in October 1917 involved her sailing from Calais to Liverpool.
She left Calais on 16 October, crossed the Channel and was heading down the coast. Her course was meant to take her round the Lizard and up the west coast of the British Isles.
At 8.20am on 28 October Leask was below, leaving the second mate in charge of the bridge. He had barely got his first mouthful of toast when a huge explosion struck the port side of the ship.
Leask rushed on deck to find his ship in chaos. The mast had gone. The aft section had been hit hard and the ship was settling rapidly by the stern.
The crew managed to get a starboard lifeboat clear. The two RNVR gunners were no longer at their posts at the stern; they had been blown overboard by the torpedo from UC63.
After 20 minutes a patrol drifter took the men from the lifeboat and headed for Poole.
The Admiralty’s first question was why the master of Baron Garioch had not been zigzagging. He replied that after passing a naval destroyer and several patrol trawlers, he had assumed that it was safe to take a straight course.
The Admiralty cautioned Leask against making such assumptions in the future. The skipper told a colleague that he had been “lucky to get away with it”.
TOUR GUIDE
GETTING THERE: Follow the A350 into Poole and the signs for the ferry. Turn left along the quayside immediately before the harbour bridge, and follow the quayside along to the Thistle Hotel. The boat pick-up point is opposite the hotel, and parking is available in the hotel car park for a reasonable fee.
ACCOMMODATION: The Thistle Hotel is particularly convenient. Cheaper accommodation in the area ranges down to B&B, hostels and camping.

HOW TO FIND IT: The GPS co-ordinates are 50 31.38N, 001 45.85W (degrees, minutes and decimals). The wreck lies with its bow to the north-west.
TIDES: Slack water coincides with high-water Dover and six hours after high-water Dover. Visibility is usually best on the high-water slack.
AIR: Forward Diving Services, Dorset Diving Services
LAUNCHING: The closest slip is at the boat park by the lifeboat station in Swanage.
QUALIFICATIONS: Just beyond 35m, the starting qualification for the Baron Garioch would be PADI AOWD, BSAC Dive Leader or a Decompression Procedures qualification from one of the technical agencies.
FURTHER INFORMATION: Admiralty Chart 2615, Bill Of Portland To The Needles. Ordnance Survey Map 195, Bournemouth, Purbeck & Surrounding Area. Dive Dorset, by John & Vicki Hinchcliffe. Shipwreck Index Of The British Isles, Vol 1, by Richard & Bridget Larn. South Coast Shipwrecks Of East Dorset & Wight, by Dave Wendes. World War 1 Channel Wrecks, by Neil Maw.
PROS: A gun, all the machinery, and usually good visibility.
CONS: The sandbank across the aft holds can make it difficult to find the stern.
Thanks to Trevor Small & Richard Styles
Appeared in DIVER March 2011